Database reactivations (DBR)… the king of low-hanging fruit for businesses with old, stale leads. At CloseBot we’ve had a very busy year. From re-building the product to migrating our own CRM from HighLevel to HubSpot. It’s been a lot. Finally, we are ready to use CloseBot ourselves to do our own database reactivation with 15,000 of our own old leads. This blog shows you exactly how we’ve set up our database reactivation campaign. Since this campaign just started, we will share a blog later that shows the results!
CloseBot Setup
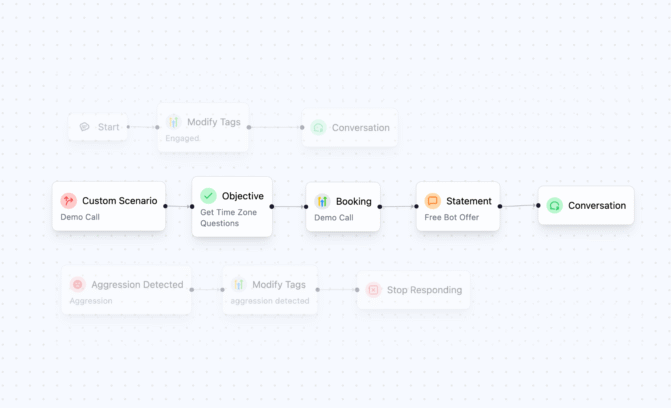
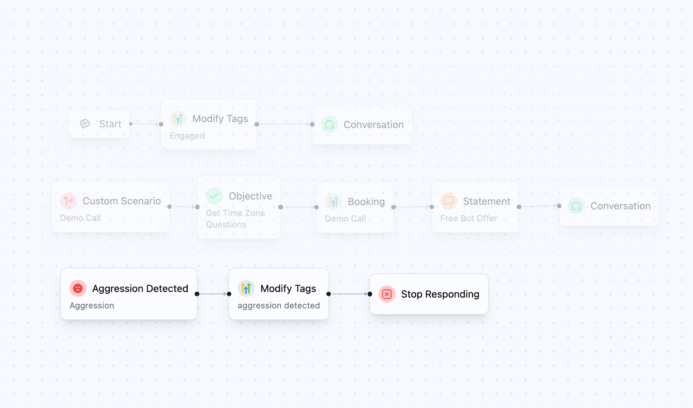
CloseBot agents are easy to set up. Learn more about how to get started HERE. We have this agent set up primarily to answer questions. However, it will conversationally book a call with a contact on our Demo Call calendar if they want and tag them accordingly if it notices that they seem angry that we have contacted them.
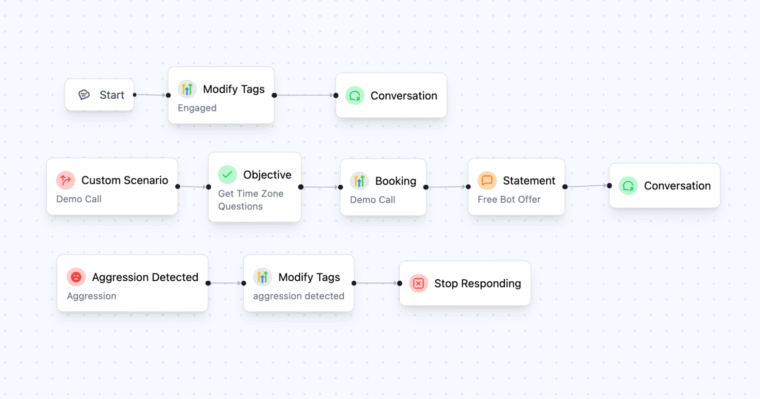
Main Conversation Job
As soon as a contact replies, we add the tag ai responded to the contact with CloseBot’s Modify Tags action. This tag will trigger a flow within HighLevel that updates the contact opportunity.
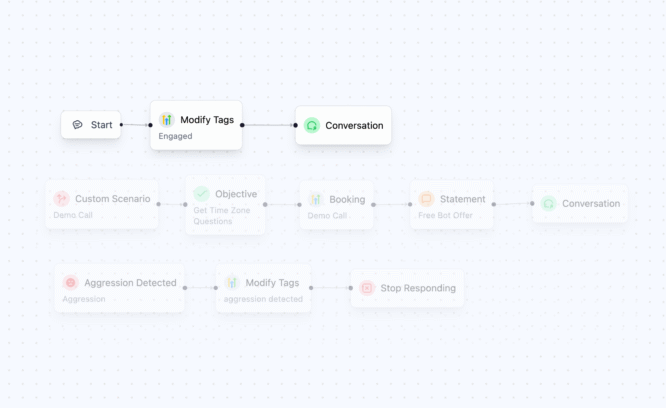
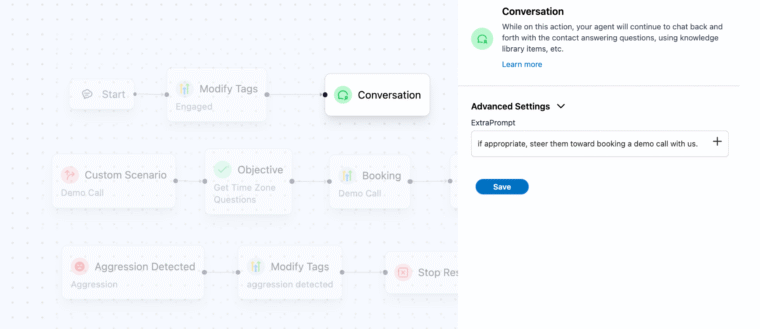
After we’ve added the tag, we have the agent simply engage with the contact via a Conversation action. Within the Conversation Action, we have some extra instruction telling the Agent that it should subtly steer the conversation toward a demo call when appropriate.
Demo Call Booking Scenario
If the scenario is detected where the contact does want to book a demo call, the agent proceeds down the job flow shown here. We get their timezone, see if they have any specific questions about the product, book the demo call to our calendar, then let them know about a gift they get by attending the demo call.
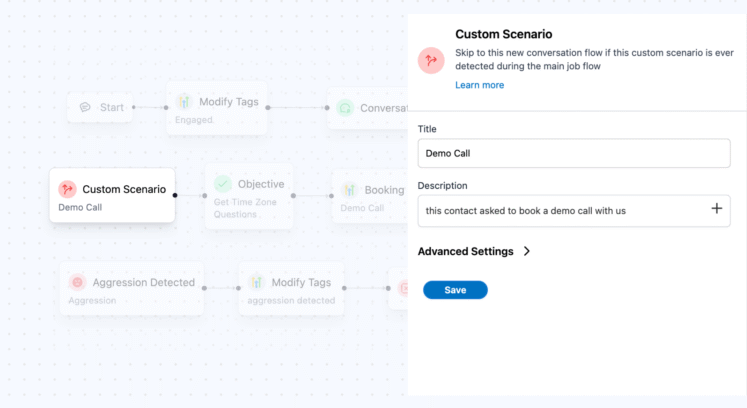
Custom Scenario
The custom scenario description is important. It lets the Agent know what it should be looking for to trigger entry into this sub-flow. Here you see we are letting the agent into this sub-flow if this contact asked to book a demo call with us.
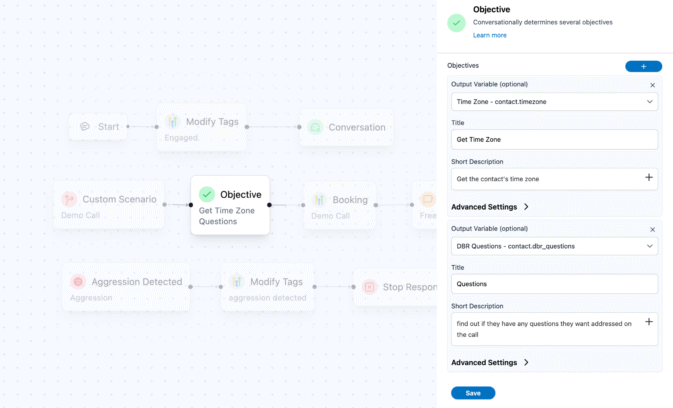
Objective
We have an objective next that conversationally gathers two pieces of information (timezone and additional questions). We need the timezone in order to book the demo call accurately. We have user data from all over the world, but these contacts being reactivated are all within the US (we filtered out non-US phone numbers). Learn more about setting up objectives HERE.
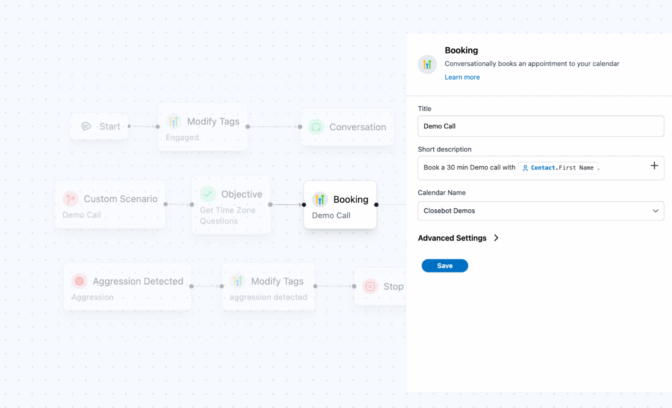
Booking
After we get the contact timezone and any additional questions they have, it’s time to book the appointment. We set up a Demo calendar within HighLevel, reflecting two weekly group demo calls that contacts are able to book conversationally.
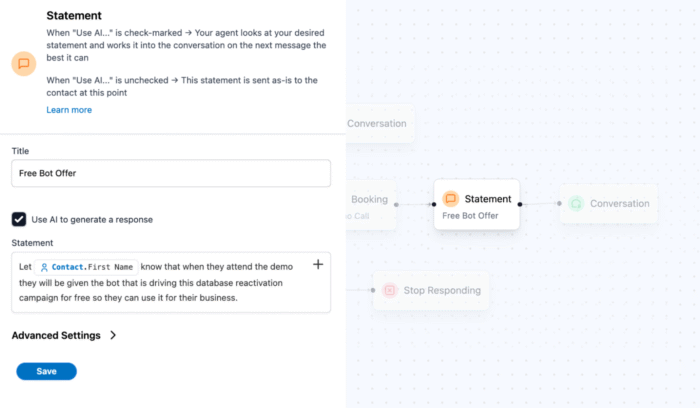
Statement
Finally, we want the agent to share that the contact will receive a gift (downloadable DBR agent) if they attend the demo call
Aggression Detected Scenario
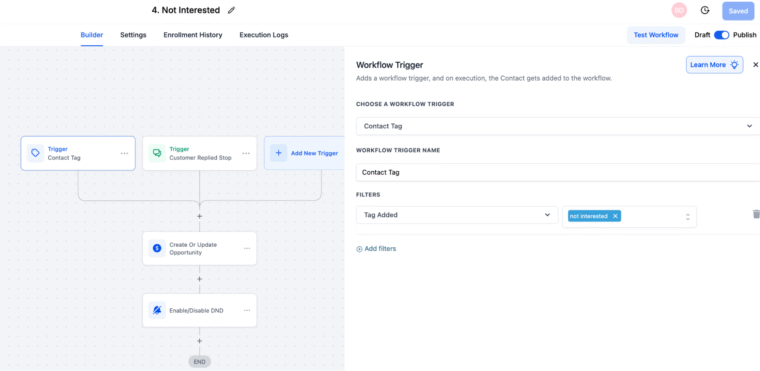
Any time you’re running a database reactivation, it’s smart to have a way to catch upset contacts. After all, we don’t want the Agent to continue messaging back and forth with contacts who are obviously upset. If we detect aggression, we want to add the ai off tag and not interested and stop responding.
HighLevel Setup
Although we made the move over to HubSpot for our CRM, we are running this reactivation campaign out of HighLevel with the help of our preferred partner Viking Marketing. The first step of running a reactivation campaign is in sending the first message.
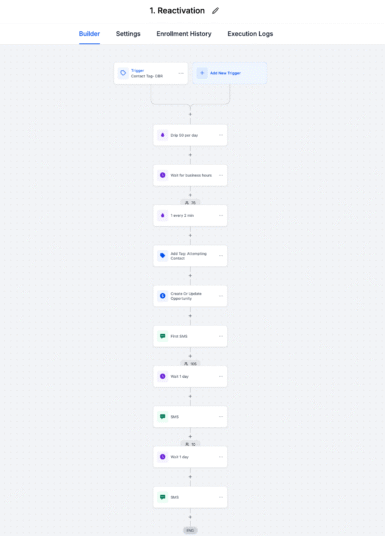
Outreach Workflow
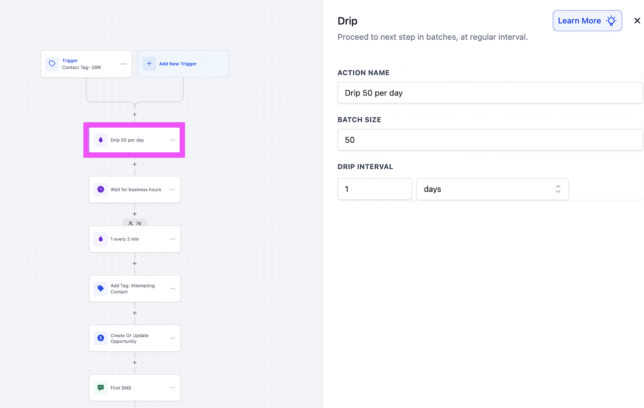
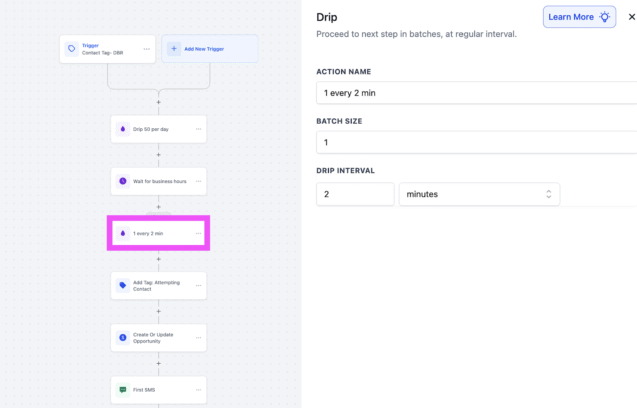
The first step was to create a workflow that we’ve called Reactivation. This workflow triggers when a contact is tagged with the tag DBR. We then drip out messages to these contacts at a rate of 50 per day, making sure to only do so within business hours. A final drip makes sure we are spacing the initial message out 1 every 2 minutes. Finally we update our opportunity stage for this contact, add a final tag so we know we’ve sent this contact a first message, and we send the first message. If there’s no response from the first message, the contact will also receive a second message 1 day later and another 1 day after that if there’s still no response.
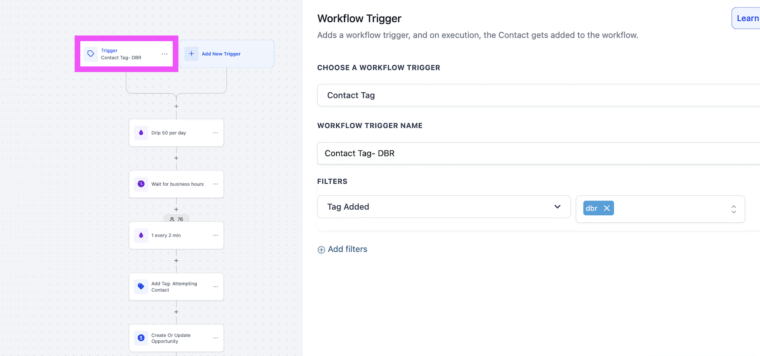
Trigger (Tag Added)
The first item we see is a trigger. This is set up to start the workflow for any contact that gets the tag added dbr. This is how we will add contacts to the flow, by adding the tag to them either one at a time or in bulk.
Drip 50 per Day
Next we make sure only 50 contacts are able to process per day. Note we will increase this as we make iterative improvements to the agent based on responses we see in production. We wouldn’t want to increase this number to much more than 500 per day max.
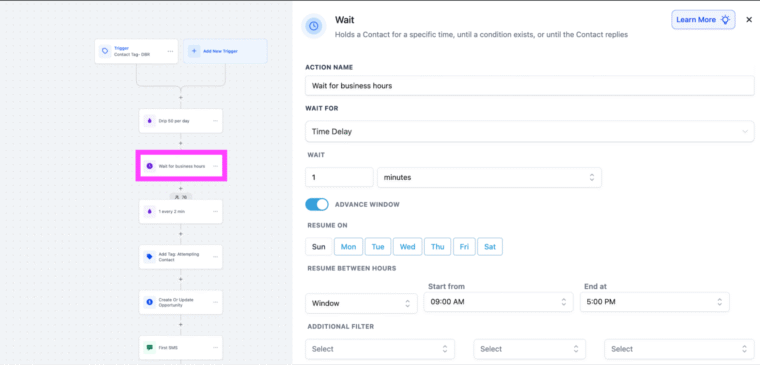
Wait for Business Hours
Next, we want to stop all contacts from proceeding until we are within business hours. For us that means we will only be sending out our messages between the hours of 9am and 5pm (Monday through Saturday).
One Every Two Minutes
Next, we make sure our contacts are all spread out 1 every 2 minutes. If we increase the daily size to anything above 200 we would want this changed to 1 every 1 minute.
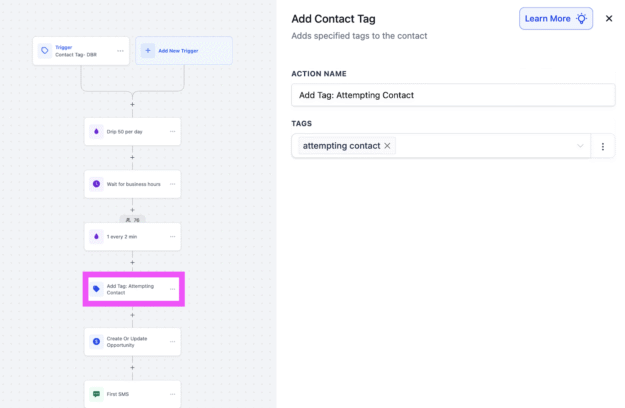
Add Tag: Attempting Contact
Finally it’s about time to send that first message. We add a tag to the contact at this stage so we know we’ve sent them that first message. It’s always a good idea to track the contact stages with tags so you avoid sending them through another reactivation campaign on accident later!
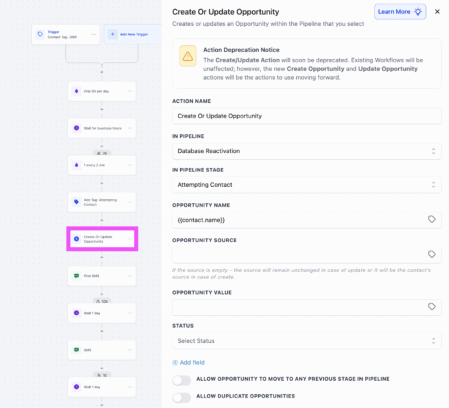
Create Opportunity
Next it’s time to create an opportunity for this contact, identifying this as the top of our funnel where we have attempted outreach. We will track this opportunity through the pipeline as CloseBot adds additional tags to the contact, triggering other opportunity updates (more on that later).
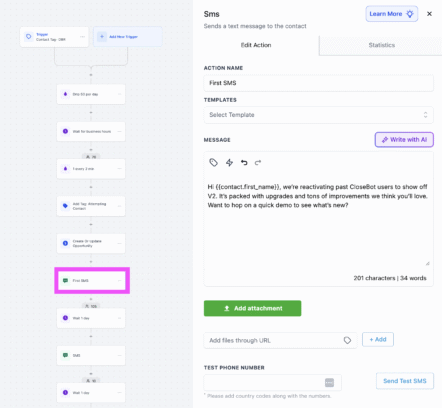
First SMS
Now we can send our first text message! We want to keep the message fun, let them know who is contacting them and ask a question if possible. Remember, CloseBot doesn’t kick in until a message is received, asking a question is a good way to get a contact to respond.
Remaining Setup
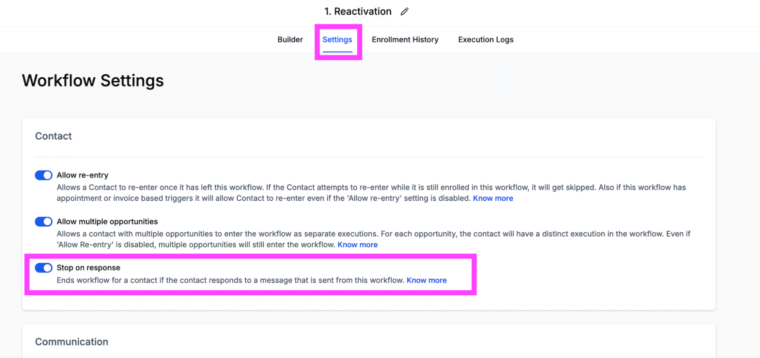
Aside from your desired amount of additional wait and sms actions, it’s also important to remember to adjust your settings to remove the contact from this workflow when a reply is received. When a reply is received, it’s time for CloseBot to take over.
Opportunity Updating
We have a couple of workflows in HighLevel that update the contact opportunity when certain tags are added by CloseBot.

Attempting Contact Stage
The contact shows up in this stage when the Reactivation workflow is run. This shows that we have sent the contact at least one message for initial outreach.
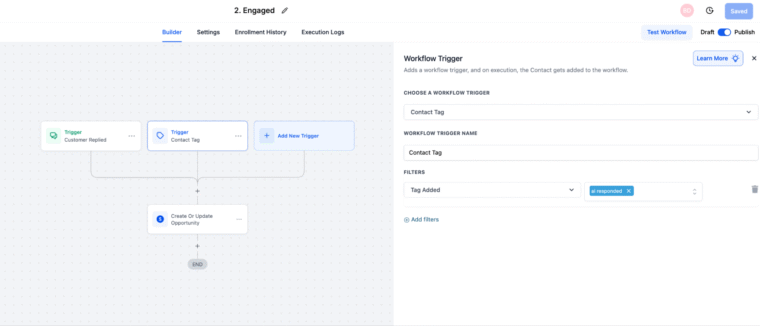
Engaged
The contact opportunity is updated to this stage when they have responded to our outreach message. Remember, CloseBot is adding the tag ai responded as soon as a contact responds.
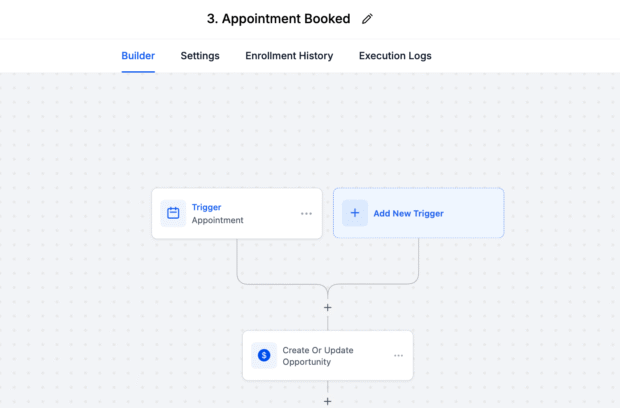
Demo Booked
When an appointment is booked we update the contact stage to Demo Booked.
Not Interested
If the CloseBot agent detects aggression or if STOP is received, we update the contact stage to not interested.
Summary
At this point, the only thing we need to do to start a contact on our reactivation campaign is to add the tag dbr… the rest, including conversational booking and Q&A is handled automatically! In a few weeks we will release a blog where we show the results of this reactivation and any lessons learned so you can set up your CloseBot agent for success as well
Go Deeper With Us Live
This blog showed you the nuts and bolts of how to run a database reactivation campaign—but that’s just the beginning.
In our upcoming live webinar, we’ll dive even deeper and cover:
- Step-by-step reactivation strategies that drive real revenue
- How to position database reactivations as an irresistible offer to clients
- Proven scripts and job flows to close more deals once those leads re-engage
- How to upsell reactivation clients into higher-margin services like ongoing AI-powered lead qualification, booking, and more
If you’ve ever wanted a repeatable playbook for turning “dead leads” into paying clients—and then growing those clients into long-term retainers—you don’t want to miss this session. Register today to save your seat!
